Perforated Acoustic Panels – Installation
Please read all instructions before installing perforated acoustic panels. These instructions are for reference only and do not substitute professional knowledge. Assuming that the installer is an experienced architect or installer, it has general construction knowledge and can be considered professional in its field.
Construction Drawings
Before production, drawings will be provided for your approval to ensure that our perforated wood acoustic panels are correct for the first time. This allows you to clearly see what you are getting and to easily make changes. Usually we also provide a complete assembly drawing that allows you to view the complete wall or ceiling components. It is invaluable to our installers because the potential timeliness and costly mistakes being picked up on paper before they become real problems in the construction process.
Batten Fix Option
Wall:
The center to center distance between battens or studs should be no more than 600mm. Fixing around the perforated acoustic panel perimeter should be no more than 200mm, and that to the center should be maximum of 400mm. You can use high-quality structural adhesive to fix the panel.
Ceiling:
The maximum is 400mm for battens, with fixing around perimeter maximum 200mm, and central maximum 400mm. We recommend the use of high quality structural adhesives with certain forms of positive fixation such as screws or panel pins. At least 3-5mm negative details between all edges of the perforated wood acoustic panel is recommended.
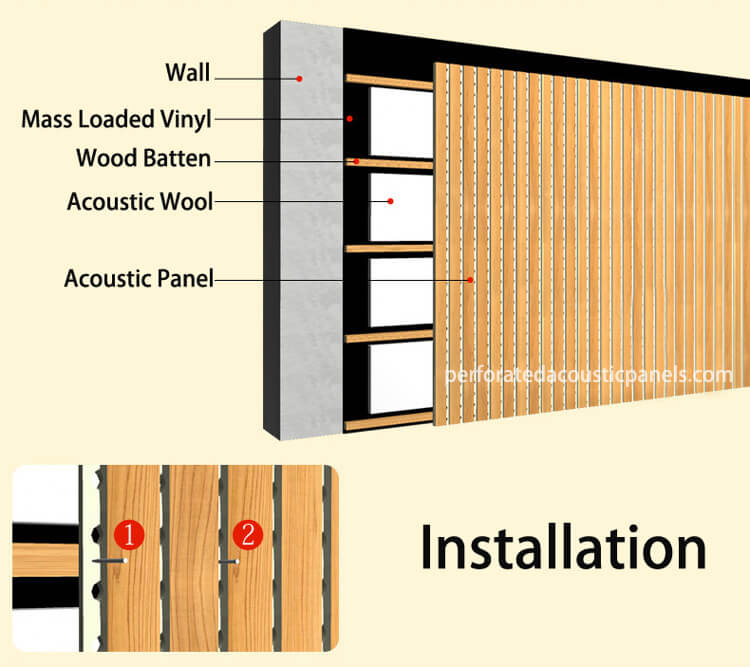
Panel Fix Options
Option 1 – Wood Perforated Acoustic Panels
Use a countersunk screw with head size slightly larger than the hole size and drive in until it is flush with the surface. Ensure that it’s embedded into the frame.
Option 2 – Grooved and Perforated Acoustic Panels
For the grooved MDF pine wood panels, we recommend using a nail gun or panel pins. The panel should be stapled at 300mm center.
Option 3 – Ceiling
You can also use a standard fixed system mounting panel and place the perforated acoustic panels ceiling tiles in a standard grid.